Sunday, February 24, 2008

Aurora Continued......

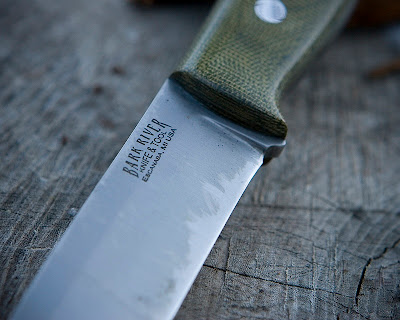
I took this next picture for a reason. Even though Barkies come sharper than any other knife I have ever seen, I knew that I would blend this secondary bevel just a bit. You can see the light shining off it here:


Well, I got a chance to do it yesterday.

First, I want to note that it is hard to tell in pictures. But, I do all my sharpening and polishing with a belt sander to keep the convex nature. By using a high grit, and multiple angled passes, I can keep it as convex as you like it, along with the natural bending of the belt around the contours that already exist. I follow that up with two leather belts on the sander with fine and finer compounds. The result is a REAL high polish, which I like.

The high polish makes it look in photos that I did more than I really did because of the transition from the satin area of the blade to the highly polished area. I am just noting this because I didn't want anyone mistaking what I did for putting a v-grind on the convex blade shape, which would be a sin. On to the pics....


The real test is in the performance. Since doing this, I have tried to put as much wood in front of this as possible. Not soft stuff either. Hard, dried, maple and oak, knots, etc. I already being happy with the ergonomics of the knife, I am VERY, VERY pleased with steel performance too.


If you like the traditional bushcraft blade shape, like I do, I would not hesitate with this one. It is the best bushcrafter I have used to date.

And yes, before you ask, I will sharpening knives if you want to send them to me.

Saturday, February 23, 2008

Aurora 2008

My Aurora 2008 showed up yesterday. Most of you probably already know this knife. So, I will stick to what you might not now.

Mike Stewart (owner of Bark River Knives) just did a new run of these for 2008. The are just now hitting the distributors. There were some minor changes from the last run that include:

- Tip made a little bit pointier.
- The grind has been modified.
- Mike mentioned something about CNC and handles. I am assuming it is for more consistency.

I love the addition of the small sharpening notch. It will allow me sharpen the entire edge easily with the belt sander, but it not big enough to get in the way or eat up a lot of space.

Anyway, enough talk, here are the pictures.


Labels:

Friday, February 15, 2008

Tatonka Pots

I mentioned a while ago that when I ordered my Tentipi, I also ordered a couple of Tatonka pots. Since they are a relatively hard item to find here in the US, I figured I would show some photos of them.

There are some features about the Tatonka that I really liked. I could find similar features in other pots, but never one with all of them together. These include:

- Bail for hanging the pot.

- Nice fitting lid.

- Lid can be used as a skillet.

- Nest easy inside each other.

- Stainless steel.

- Nothing on the lid to prevent me from heaping hot coals on it.

- No non-stick coating.

- I liked the width and height dimensions of these much better than the Zebra billy cans.

So, on to the photos. Here is the kit all together. I bought the 1.6L pot, and the 1L pot. You will notice the lid for the larger pot in the photo. The lid for the smaller part is being used, and you will see why later. There is also the removable skillet handles in front. The Pepsi can is for scale.


This photo shows the skillet handle attached to the lid. Not only can this be used for using the lid as a skillet, but also for removing a hot lid from a boiling pot.


Here they are shown nesting inside each other.


Here is a photo of the Trangia alcohol stove inside the whole setup. I put the wash cloth in there purely from a noise perspective. I did not want things clanging around in my pack. I can put the lid on the small pot, put in the skillet handles, put the lid on the large pot, and then have the entire kit fit within the largest pot. Shown below:


Just a quick word about stoves; I hate them, and I don’t think they belong in the woods. I believe in keeping things as simple as possible and using resources that are easily at hand. This means that I don’t want a stove that is finicky, prone to breaking, costs near $100, requires me to carry spare parts, and causes me to worry about fuel quantities. There is nothing that will ruin a trip to the woods quicker than dragging all the trappings and headaches of daily life along with you. I go to get away from this sort of thing.

With all that being said, I have added the Trangia to kit because it is the simplest of them all, and is VERY inexpensive (about $5). The thing is a brick, with no moving parts, and pretty much nothing to go wrong with it. I will avoid using it if possible, and mainly have it in there because it fills dead space, and for emergency purposes. When I say “emergency” I don’t necessarily mean that a SAR team is looking for me. I mean it in the terms of it is nasty out, raining, and a cranky 2 year old is waiting for food : )

So, there is the kit. If it seems a bit on the large side, keep in mind that it is for a family of four. If it were just me, depending on the circumstances, I might leave it as is, or put the 1L pot out, and take just that.


The Swedish mess kit that can be purchased with the stove is also a very versatile setup. But, the things I prefer about this set are the following:

- 2 circular shaped frying pans.

- If using a lid, these are much easier to remove.

- The ability to bake.

How would I bake with these? I am glad you asked. Making something like damper bread would be a piece of cake with these. I would place 3 rocks in the bottom of the large pot. Grease (or flour) the lid from the small pot and put the damper bread in there and place that on the rocks in the larger pot. Put the large lid on. Rest the large pot on a bed of coals, and put additional coals on the lid.

Here is a photo of damper bread being cooked in the small lid. On this occasion I used the house stove because I was tweaking my bread recipe (I didn’t want too many variables in there). This damper was to accompany soup, so I added garlic and cheese to the mix. If it were for breakfast, I would have added brown sugar, raisins, dried fruit, or anything else you have with you.


Next is to try it with the coals. If it were my cast iron dutch oven, I would be able to do this with my eyes closed, as I have a lot of experience cooking with those. I am sure it will take me a couple trials getting used to the thinner, lighter and smaller stainless steel pot.

Eventually, I will post more pics of these pots in action.

Saturday, February 9, 2008

Freezer Bag Cooking

I actually wrote this article back in early January. I never posted it because I was planning on saving the content for the Backyard Bushcraft website. However, I have had many hosting issues, and decided to just start posting the articles I have been saving.

I did round two of this today, with a different recipe and it turned out really good.

A while ago I was researching dehydrators, mainly for drying out fruit. I really like dried fruit, especially apples. In doing so, I came across a really cool website called Freezer Bag Cooking.

It seems geared more towards backpackers, but many of the recipes can used for canoe trips, real deep backwoods, or even car camping where you don’t want to have to worry about refrigeration. I did not get the book, just printed off all of the recipes from the website. Looking through them, some of them actually look quite tasty!

As we have been cooking dinner and had leftover ground beef, or taco meat, or onions and bell peppers, I would just throw them in the dehydrator and dry them out for later. I finally got a good supply of my own dried foods in order to try one of the recipes out for the first time. You could of course buy the dried ingredients, but what the fun is that : )

So here are the ingredients laid out for the first recipe I tried. We have instant rice, cooked and dried red beans, dried onion, dried bell pepper, dried tomato and dried taco flavored meat. The recipe called for taco flavored TVP…..YUCK! I tell you something, if you ever catch me in the same room as TVP it is a cry for help. Slap me around and PLEASE drag me back out to the woods! There is also three different spices in the tablespoon: chili powder, minced garlic, and dried oregano.


All packed up in a gallon freezer back, ready to go in a pack:


I boiled one cup of water, and poured it in the bag. The Freezer Bag Cooking website sells fancy cozies for your cooking bag, but I went he knit hat route here.


Wait 10-15 minutes, and lunch is ready.


The best part about this whole thing is there are no additional cookware required, no extra plates and bowls to carry, and no cleaning dishes. Since you should be packing these extra freezer bags out too, once they are empty they have several other potential “survival” uses in case of emergency.

The important thing: how did it taste? I have to admit, it was only okay. There are some other recipes that look better, but I did not have all the right ingredients. The two things that could have improved this recipe is I don’t think the TVP to real meat conversion was quite correct. It could have used a bit more meat. Second, it could have used some more spices. It was kind of on the bland side. I think I will try both of those things next time, and I think it would greatly improve the taste.

I am looking forward to trying some more soon.

Friday, February 1, 2008

The Tentipi is Here!!!

Well, the Tentipi showed up yesterday. Since it was coming from the UK, it got here quicker than I had expected.

By the time I got home from work, it was dinner time. We are supposed to be getting 6-10" of snow between the early morning and today, so Jen wanted to run out the store for some supplies in case she couldn't get out tomorrow.

I had to at least get it out, unroll it, read the directions and check everything over. At the first insepction, I was very impressed. By the time she got back it was well after dark, and below freezing. Do you think I am going to go out in the dark freezing weather and try setting up a new tent for the very first time? Of course I did!!!

The tent is a breeze to set up. There are basically ground straps that anchor the tent body to the ground. You go around in a circle and shove 8 stakes in the ground (not all the way, because you need to hook the ground straps to them). Then, you position the door where you want it, and go hook the ground straps all around. The ground straps are loosened all the way up to make setting up the tipi easier.

Next, you put in the center pole and pop the whole thing up. I have to admit, I went inside to put the pole in the center, and saw a bunch of cords inside and started to worry that this is going to get complicated quick. But, that was not the case. I put the pole it, popped the thing up, walked around the outside and tightened up the ground straps. That was it.

After it was all up, and in place, I figured out the cord system. It is actually a really cool setup. There are a couple sets of cords.
1) The storm cords on the outside are meant for staking the outside walls of the tipi in extremely bad weather. The instructions advise that they are only for "strong winds" and from people that I know have used these tipis claim that 99% of the time they do not use them. The cords are bundled up on the to the attachment point on the outside of the tipi, and there is a bungee with lock on it to hold it in place when not in use. A very slick setup.
2) Inside there is a set of cords running up to the ventilator caps. They are all bundled into one location, and run into a sleeve on the inside of the tipi. They each exit their own hole in the sleeve and have a lock on them for individual adjustment. These cords basically control one of the 2 ventilator caps up top. How many cords you pull control how open the cap becomes. Release the cord, and it is pulled back into position from the outside.

The two ventilator caps are pretty slick. The larger one will open directly to the sky with no netting. It is used for sticking a stove pipe through, or when you have an open fire on the ground. The smaller cap has a screen in place when opened up. This one is just used for ventilation in general. More on that later.

Besides having a door with a screen, this particular model has 3 fresh air vents around the bottom of the tipi. Besides allowing you to have an open fire, these vents are supposed to create air flow even on a hot windless day. The height differential between the inlet and outlet is supposed to create a chimney effect, and give air circulation even when there is no breeze. I have obviously not tried it yet, but from what I have heard, this is supposed one tent you can actually stand to get into during the middle of a hot day, while exposed to the sun. I am sure you all know how most typical tents are in that situation.

Back to the lower vents; in between the make support lines of the tent is where the vents are. Big and about 3 feet long. There is a smaller stake that holds the tent to the ground. Then there is a small storm cord that is staked about another foot out. This creates a little inlet. Then, on the inside of the tipi there is a zipper that allows you to control the size of the vent opening. Of course there is a screen in place to keep the bugs out.

I also got the optional floor with this, that unzips in the center to allow you to have an open fire. I checked out the floor, but did not try setting up that part in the dark and cold. More to come on that one.

I did not take any photos because it was so dark. The next time I get a chance to set this up during the day, I will take lots of photos.

All in all, I am extremely happy with the tipi. There is not a single thing I am disappointed with. The construction and the materials are unbelievable. But, while I am super impressed I also say that I damn well better be. This was not the price of your ordinary tent and therefore it should be everything that I expected it to be.

I also got the 2 Tatonka pans which are extremely nice. I won't bore you with a description. I will just take some photos of them in use when I get there.

That is all for now......hopefully some pictures next time.

Labels: , ,